App Security
Learn how to configure app credentials.
Note: This topic relates to setting up managing app security within the platform. For detailed information about how to set up your app to authenticate with an API hosted on the platform, refer to App Security Options and Setup.
Table of Contents
App Security General Information:
- How do app credentials work?
- What are the options in the Security section of the App Details page?
- How do I transfer an app defined on another system to the developer portal?
Shared Secret:
- What is a Shared Secret?
- How do I regenerate a shared secret?
- How do I decrypt an encrypted shared secret?
- How do I use the command-line decryption tool to decrypt my shared secret?
- What rules apply to generating an App ID and Shared Secret?
- How do I view a shared secret?
App Credentials (Certificates/CSRs):
- How does public key integration work?
- What is a Certificate Signing Request (CSR)?
- What is a Trusted CA Certificate?
- Where are the Certificate Authority and Trusted CA Certificate files stored?
- How do I select a tool for generating a Certificate Signing Request (CSR)?
- How do I import a certificate signing request?
- How do I import an X.509 certificate?
- How do I modify my app's credentials?
- How do I remove app credentials?
- How do I export app credentials?
App Security: OAuth
- How do I determine if my app needs OAuth credentials?
- How do I configure OAuth credentials?
- How do I configure an OAuth Resource URL and Application Type?
- How do I configure a Resource Owner OAuth Authorization page for my app?
- What are the OAuth 2.0 Client Types?
App Security General Information:
How do app credentials work?
When your app sends messages to an API, your app's credentials identify it as the sender of the message. Very few APIs accept anonymous messages; in general, you'll need to set identify your app with every message.
As part of setting up your app, you must set up your app security on the App Details page, following these high-level steps (more details provided below):
- Select App Protocol / Determine Credential Approach.
- Configure Security Credentials.
- Set Values in App Details > Security.
Select App Protocol / Determine Credential Approach:
There are several choices available to you in terms of security configuration for your app. You'll need to make sure you choose a security mechanism that's acceptable for the API or APIs you want your app to use.
The choices are:
- Plain text App ID
- HMAC Signature with Shared Secret
- Hash/Digest with Shared Secret
- RSA Signature with PKI
- OAuth 1.0a
- OAuth 2.0
For more detailed information about application security options, refer to App Security Options and Setup.
Each API is pre-configured as follows:
- Each API is assigned either an "API Consumer Application Security Policy" or "OAuthSecurity Policy" that is defined in the Tenant.
- If the API supports OAuth, the API's OAuth Provider configuration is set to the OAuth version and grant types it supports.
The credential approach configured in the app must match the protocol supported by the API as defined in these policies. Review the API documentation to verify the supported protocols.
Configure Security Credentials:
To authenticate your app when placing API calls, you must include your App ID and either a Shared Secret or your Public Key for PKI-based authentication (in the form of a CER or CSR).
- Please note that each version of your app requires a separate set of security credentials.
- Also note that you will need to obtain access to an API and you must configure credentials correctly in order to make a successful call to the API sandbox or production endpoint.
Set Values in App Details > Security:
The Security section of the App Details page includes the Show Keys function that displays the Shared Secret and Public Key options for generating or importing the credentials required to authenticate your app in the sandbox or production environments. When deciding on the type of security credentials you'll use for your app, it's a good idea to review the API documentation for APIs you'll want your app to use, to verify what the API supports and any requirements it might have.
When an app is initially created using the Add New App function, a shared secret is either provided, or is generated automatically. You can view the Shared Secret in the App Details > Security section by clicking Show Keys and selecting Click to View. You can use the Regenerate Key option to issue a new shared secret.
Note: Depending on the platform settings specified by your Administrator, the shared secret displayed on the App Details page might be encrypted. If the shared secret is encrypted and you need the actual value, you can decrypt it using the app's private key.
If you would like to use PKI-based encryption, you can use the Public Key option. The Import Credentials function allows you to upload a Certificate Signing Request (CSR) with your public key embedded or an X.509 Certificate (CER).
- After you have uploaded the CSR, the Certificate Authority associated with Tenant generates a certificate and associates the certificate with your app.
- If you uploaded an X.509 Certificate, it is verified against the Trusted CA Certificate store on the Tenant.
OAuth 1.0a and 2.0:
If you are using OAuth 1.0a and the Authentication Code and Resource Owner Credentials grant, or OAuth 2.0 and the Authentication Code and Implicit grant, you must specify a Redirect URL and Application Type, then configure an authorization screen. This task is performed in addition to configuring security credentials and is optional based on your requirements.
- The show OAuth Details section on the App Details page is used if the OAuth Provider configuration of the API is set to OAuth 1.0a or OAuth 2.0 (with the grants stated above), and the "OAuthSecurity Policy" is selected in API configuration.
- To specify OAuth Details: In the Security section of the App Details page, click Show OAuth Details, and then click Edit to specify or modify OAuth Details. In the Edit OAuth Details overlay, specify the Redirect URL (the address of the authorization server) and the App Type (Public or Confidential). For more information about these settings, see How do I configure an OAuth Resource URL and Application Type?
- Then use the Public Profile function to define a Resource Owner OAuth Authentication page. See . How do I configure a Resource Owner OAuth Authorization page for my app? for detailed instructions.
What are the options in the Security section of the App Details page?
Once you've created your app, you can manage app security via the Security section of the App Details page.
By default, only the App ID is displayed. Click the following links to view security-related information and perform security-related activities:
- Show Keys—Provides access to multiple buttons, allowing you to complete the following activities relating to your app's security:
- Regenerate Shared Secret. See How do I regenerate a shared secret?
- Click to view shared secret
- Modify Credentials: See How do I modify my app's credentials?
- Remove Credentials: See How do I remove app credentials?
- Export Credentials: See How do I export app credentials?
When the buttons are visible, you can click Hide Keys to collapse the display again.
- Show OAuth Details—Provides access to a display of the values you've set up already for OAuth, if any, and edit capability:
- Redirect URL: (display only)
- Application Type (display only)
- Edit button allowing you to specify initial values or modify existing values.
How do I transfer an app defined on another system to the developer portal?
If you have an app that you have defined on another system that includes an App ID or Shared Secret you can transfer it to the platform based on the following scenarios:
- New App – If this is the first app version of your app, you can add it using the Add a New App function via the Plus menu and specify the App ID in the "App Runtime ID" field, and the Shared Secret in the "App Runtime ID" field. See How do I create a new app? for more information.
- App Version – If you would like to add an app defined on another system as a "version" of an app that is currently added to the platform, you can use the –Version function on the App Details page and specify the custom App ID in the "App Runtime ID" field, and custom Shared Secret (if applicable) in the "App Runtime ID" field. See How do I create a new version of my app? for more information.
Shared Secret:
What is a Shared Secret?
When you register your app, you have the option to specify an App Runtime ID and Shared Secret. If you do not specify values, they are generated for you.
These two values are used to identify your app when using the platform.
The Shared Secret is a binary hashed value known only to you and to the platform. In the Security Credentials section of the App Details page you'll see an option to view and manage your app's Shared Secret.
The Shared Secret approach follows the WS-Security digest authentication mechanism.
When generated by the platform for the app, the Shared Secret is a 40-character alphanumeric value. An example is shown below.
1008877afabf32efb31f9c974dbeaa688bed0769
How do I regenerate a shared secret?
When you initially create an app using the Add a New App function, either you provide a value for the shared secret or it is automatically generated. If for any reason it becomes necessary, you can regenerate the shared secret later.
Note: Depending on the platform settings specified by your Administrator, the shared secret displayed on the App Details page might be encrypted. If the shared secret is encrypted and you need the actual value, you can decrypt it using the app's private key.
To regenerate a shared secret:
- Navigate to the App Details page for the app.
- Navigate to the Security section and click Show Keys to display the key generation options.
- In the Shared Secret section, click Regenerate Shared Secret.
- Enter a comment regarding why you are regenerating the shared secret for the app. Share any relevant information.
- Click Confirm. The shared secret is regenerated and the Shared secret updated message displays. Use Click to View to see the new shared secret key.
Note: Depending on the platform settings specified by your Administrator, the shared secret displayed on the App Details page might be encrypted. You can decrypt it using the app's private key.
How do I decrypt an encrypted shared secret?
If the version of the platform that you're using is set to display the shared secret as an encrypted value, you'll need to decrypt to get your app's actual shared secret value so you can use it when sending request messages to platform APIs.
If you uploaded a certificate/CSR for your app, the platform uses your app's public key to encrypt the plain text shared secret. You can then use your app's private key to decrypt and arrive at the plain text key.
It's important that you make sure you use the private key that corresponds to your app's public key that was uploaded to the platform. If the keys don't match, decryption will not give you the correct plain text value, or will fail completely.
If you have any doubt that the keys match, there are a couple of things you could do:
- Save the app private key and certificate together in a standard keystore format that supports both of them. Then, use the certificate serial number (or hash) with the hash/serial number that can be exported from the developer portal.
- Upload the certificate to make sure the platform has the latest public key, then display the value again and decrypt the new value.
The approach you use to decrypting the encrypted shared secret value will depend on the tools and technologies you're using for your app. Basically you'll need to accomplish these steps:
- Copy the encrypted shared secret value from the App details page. If it's not visible, click Show Keys, and then click the Click to view button and copy the displayed value.
- Apply base64 decoding to take away the encoding cover and arrive at the encrypted bytes that are the shared secret.
- Make sure you are using the private key that corresponds to the certificate uploaded for the app.
- Use the appropriate cypher to decrypt a value encrypted using the RSA algorithm with PKCS1 padding. The decrypted bytes are an ASCII representation of the plain text shared secret.
- Retrieve the result and use it for your app's runtime.
Below is an example of an approach that would work if you have access to the Java runtime environment.
You can also use the command-line decryption tool. For more information, see To use the command-line decryption tool to decrypt the shared secret.
import java.io.FileInputStream;
import java.security.KeyStore;
import java.security.PrivateKey;

import javax.crypto.Cipher;

/**
 *  Akana, Inc. Copyright (C) 2000-2015, All rights reserved
 *
 *  This  software is the confidential and proprietary information of Akana, Inc.
 *  and is subject to copyright protection under laws of the United States of America and
 *  other countries. The  use of this software must be in accordance with the license
 *  agreement terms you entered into with Akana, Inc.
 */

/**
 * Copyright (c) 2015, Akana, Inc.  All rights reserved.
 */

public class AppSharedSecretDecryptionTest {

  /**
   * @param args
   */
  public static void main(String[] args) {
    try {
      // Copy encrypted shared secret from portal's App details page using View Shared Secret button "Click TO View" button
      String encryptedSharedSecret = "--copy--encrypted--shared--secret--from--portal--here";

      // base64 decode to take away encoding cover to get encrypted bytes
      byte[] encryptedSharedSecretBytes = org.apache.commons.codec.binary.Base64.decodeBase64(encryptedSharedSecret);

      // make sure you are using the private key that corresponds to the certificate uploaded for the app
      KeyStore ks = KeyStore.getInstance("PKCS12");
      FileInputStream fis = new FileInputStream("/path/to/keystore");
      try {
        ks.load(fis, "keystore-password".toCharArray());
      } finally {
        fis.close();
      }
      PrivateKey pvtkey = (PrivateKey)ks.getKey("key-alias", "key-password".toCharArray());

      // Shared Secret was encrypted with RSA algorithm with PKCS1 padding.
      Cipher cipher = Cipher.getInstance("RSA/ECB/PKCS1Padding");
      cipher.init(Cipher.DECRYPT_MODE, pvtkey);
      // Decode
      byte[] sharedSecret = cipher.doFinal(encryptedSharedSecretBytes);

      // prints the shared secret on screen. Use this shared secret in the app runtime
      System.out.println("Shared Secret = " + new String(sharedSecret));
    } catch (Throwable t) {
      t.printStackTrace();
    }
  }
}
Note: If there is no certificate/CSR for your app, and the platform is set to display the shared secret as an encrypted value, you'll need to contact your Administrator to get the shared secret value.
How do I use the command-line decryption tool to decrypt my shared secret?
If the version of the platform you are using is set to display your app's shared secret value in an encrypted format, you'll need to decrypt it so that you can use the shared secret when sending request messages to platform APIs.
The platform includes a tool that you can run at the command line to decrypt the shared secret, if you have Java installed. Follow the instructions below.
To use the command-line decryption tool to decrypt the shared secret
- Download the sharedsecret_decrypt.zip file to a folder on your local machine.
- Unzip the file. It includes the following:
- AppSharedSecretDecryptionTest.jar
- project.properties
- In the project.properties file, specify valid values (placeholders are shown as {value} below; remove value plus brackets and replace with actual value) for the following properties:
- encrypted_shared_secret={value} (value copied from App Details page)
Example: Yeog3Mh5+9wY6mC9Udad4yU62U1PujYE5LEoD2fKYgPXTtkbij9rU/Vm3NrjL55/eG0Qn3r4ZAj46HY94YwvtvjKuG4
MX2sOFiWb2V2Afz54yUuGPXfsQ/E4UC+VXl3KeMMCQZ5X94/CwmukjpjiZ/q0zFp/pyBXs9fNAyzkDWk - keystore_path_filename={value}
Example: C:\\temp\\Hermosa.jks - keystore_alias={value}
Example: hermosa - keystore_pass={value}
Example: abc123 - keystore_type={value}
Example: JKS
- encrypted_shared_secret={value} (value copied from App Details page)
- Open up a command window and navigate to the folder where you have the downloaded files.
- At the command prompt, run the following:
java -jar AppSharedSecretDecryptionTest.jar project.properties
- The plain text shared secret value is displayed at the command prompt. Copy it for use with your app.
For general information about the decryption process, refer to How do I decrypt an encrypted shared secret? above.
What rules apply to generating an App ID and Shared Secret?
Before you add an app to the platform, review the following rules for generating an App ID or Shared Secret to determine the best approach for adding and managing your apps.
App ID:
- When an app is created, you can specify a custom App ID. If the App ID field is left blank, the app is randomly assigned an App ID (i.e., identity) in the format <fedmember> - <random-hex>.
- Once an App ID is assigned it cannot be changed for the current app version.
- A new App ID can be assigned to a new app version using the +Version function on the App Details page and entering a new App ID in the "App Runtime ID" field.
- You cannot update an App ID using the Edit function on the App Details page. A new App ID can only be issued at the time the initial app is created using the Add a New App function, or when creating a new app version using the +Version function.
Shared Secret:
- When an app is created, you can specify a custom Shared Secret. If the Shared Secret field is left blank, a shared secret is automatically generated and can be viewed using the Show Keys function on the App Details page.
- Depending on the platform settings specified by your Administrator, the shared secret displayed on the App Details page might be encrypted. If the shared secret is encrypted and you need the actual value, you can decrypt it using the app's private key.
- to regenerate the Shared Secret for a specific app using the Regenerate Key function on the App Details page.
How do I view a shared secret?
To view the current shared secret:
- Navigate to My Apps.
- Select the App Name in the summary listing. The App Details page displays.
- Select an app version from the Current Version drop-down menu.
- In the Security section, click Show Keys to display the key generation options.
- Select Click to View to display the current shared secret.
App Credentials (Certificates/CSRs):
How does public key integration work?
If you use the Public Key option, you must import an existing X.509 Certificate (CER) or Certificate Signing Request (CSR). Usage of either public key option is based on your requirements. The Tenant can be configured with an internal Certificate Authority, and could also be configured with a set of Trusted CA Certificates apart from the internal Certificate Authority.
The following rules apply:
Prerequisites:
Based on the established public key strategy for your platform at least one of the following Public Key options must be established on the Tenant before you can successfully import a Certificate Signing Request (CSR) or X.509 Certificate (CER).
- A Certificate Authority (CA) (internal or third-party) that can issue and renew X.509 certificates must be previously configured in the Tenant. See What is a Certificate Signing Request (CSR)? for more information.
- Trusted CA Certificates that may be required must be uploaded to the Trusted CA Certificates section of the Tenant. See What is a Trusted CA Certificate? for more information.
Configuring an internal Platform Certificate Authority is a post installation task that is performed by the Site Administrator. In most cases, a formal CA (for example, VeriSign) that aligns with the security policy requirements is uploaded, in addition to any Trusted CA Certificates that may be required.
If you receive an error message indicating that the X.509 Certificate or Certificate Signing Request (CSR) you are attempting to import is not trusted or that a Certificate Authority does not exist.
Import Certificate Signing Request (CSR):
- If the Tenant is configured with a Certificate Authority, you can generate a Certificate Signing Request (CSR) using an online tool, and import it using the Import Credentials function in App Details > Security > Public Keys section.
- If the import is successful, the CSR and the Certificate Authority (CA) associated with the platform are used to generate the certificate for the app.
- See How do I select a tool for generating a Certificate Signing Request (CSR)? and How do I import a certificate signing request? for more information.
X.509 Certificates (CER):
- If your Tenant is configured with Trusted CA Certificates, you can import an X.509 Certificate (CER) for the current app using the Import Credentials function in the App Details > Security > Public Keys section.
- The CER import will be successful if it matches the Trusted CA Certificate that is uploaded to the Trusted CA Certificates section of the Tenant.
What is a Certificate Signing Request (CSR)?
A Certificate Signing Request (CSR) is a file that includes encoded information generated by a web server. It is sent from an applicant to Certificate Authority to request a digital certificate. The CSR contains information identifying the applicant and the public key chosen by the applicant. Before creating a CSR, the applicant first generates a key pair, keeping the private key secret. The corresponding private key is not included in the CSR, but is used to digitally sign the entire request.
A CSR file typically has a .CSR extension but can have other extensions based on the source application that generated the file. The Tenant supports the PEM (which is a BASE64 encoded PKCS10) for Certificate Signing Requests.
In the platform, a CSR is used to send a request to the Certificate Authority stored on the Tenant to request an X.509 Certificate.
The Tenant must be configured with a Certificate Authority prior to importing a CSR. This task is performed by the Site Administrator.
What is a Trusted CA Certificate?
A Trusted Certificate Authority (CA) is a third party identity that is qualified with a specified level of trust. Trusted CA Certificates are used when an identity is being validated as the entity it claims to be. Certificates imported into Tenant must be issued by a Trusted CA Authority.
Trusted CA Certificates must be configured prior to importing X.509 certificates for platform apps. This task is performed by the Site Administrator.
Where are the Certificate Authority and Trusted CA Certificate files stored?
The platform Certificate Authority and Trusted CA Certificate files are stored on the Tenant. The Tenant is a distinct developer portal and community that is logical separated from any other communities that may be hosted in the same product instance. The Tenant is managed by the Site Administrator.
How do I select a tool for generating a Certificate Signing Request (CSR)?
There are a variety of different tools you can you can use to generate a Certificate Signing Request (CSR). For example, Keytool and OpenSSL are popular CSR generation tools.
- Perform an online inquiry using search strings like tools, certificate signing request or How do I generate a certificate signing request externally?
- The results will provide all the information you need to select a tool that will work for you and meet your requirements.
In the context of the platform the process is as follows:
- Generate a public and private key using an external tool. Use your private key to sign your API call. Use your public key to generate the Certificate Signing Request.
- Generate the Certificate Signing Request (CSR) using an external tool as well.
- Import the CSR into the platform. This is done using the Import Credentials function. See How do app credentials work?
- Obtain a copy of the generated certificate. This is done using the Export Credentials function. See How do I export app credentials?
How do I import a certificate signing request?
For your app's credentials, you can import either a certificate signing request (CSR) or an X.509 certificate (CER).
If you import a CSR file, the platform uses its internal Certificate Authority to create the CER from the request.
To import a certificate signing request (CSR):
- Navigate to the App Details page for the app.
- Navigate to the Security section and click Show Keys to display the key generation options. In the Public Key section, click Import Credentials. The Import Credentials pop-up displays.
- Click Browse and then navigate to the location of your CSR file and select it.
- Enter a comment regarding why you are importing the CSR. Share any relevant information.
- Click Save.
- The Certificate Signing Request (CSR) is imported and the certificate is generated if it meets the platform's requirements. If the CSR you are attempting to upload is expired or invalid, or a Certificate Authority does not exist on the Tenant, you will see an error message.
How do I import an X.509 certificate?
For your app's credentials, you can import either a certificate signing request (CSR) or an X.509 certificate (CER).
To import an X.509 certificate (CER):
- Navigate to the App Details page for the app.
- Navigate to the Security section and click Show Keys to display the key generation options. In the Public Key section, click Import Credentials. The Import Credentials pop-up displays.
- Click Browse and then navigate to the location of your CER file and select it.
- Enter a comment regarding why you are importing the certificate. Share any relevant information.
- Click Save.
- The X.509 Certificate is imported if it meets platform requirements. You will see an error message if:
- The CER you are attempting to upload is expired or invalid.
- The certificate is not issued by a Trusted CA.
- The Certificate Authority does not exist on the Tenant.
How do I modify my app's credentials?
You can modify your app's credentials as needed. Remember to enter some meaningful comment regarding why you are changing the credentials.
To modify your app's certificate:
- Navigate to the App Details page for the app.
- From the Current Version drop-down at the top right, choose the app version you want to modify.
- In the Security section of the page, click Show Keys.
- Click Modify Credentials.
- Browse to the location of the CER/CSR file and upload it.
- Enter a comment regarding why you are modifying the credentials. Share any relevant information.
- Click Save.
How do I remove app credentials?
If necessary, you can remove the credentials for your app. You'll need to provide information about why you are making the change.
To remove your app's credentials:
- Navigate to the App Details page for the app.
- From the Current Version drop-down at the top right, choose the app version you want to modify.
- In the Security section of the page, click Show Keys.
- In the Public Key section, click Remove Credentials.
- Enter a comment regarding why you are removing the credentials. Share any relevant information.
- Click Save.
Later, you can use the Import Credentials function to import a new Certificate Signing Request (CSR) or certificate (CER). See How do I import a certificate signing request?
How do I export app credentials?
After the Certificate Signing Request is imported and the certificate is generated, you can download the app certificate.
To download the app certificate:
- Navigate to My Apps.
- Select the App Name on the summary listing. The App Details page displays.
- Select an app version from the Current Version drop-down menu.
- Navigate to the Security > Public Key section. Click Export Credentials. The Opening dialog box displays.
- To save the certificate file, click the Save file radio button.
App Security: OAuth
How do I determine if my app needs OAuth credentials?
To verify what version of OAuth an API supports, consult the supporting documentation of the API. Then refer to How do app credentials work? and How do I configure OAuth credentials? to continue the process.
How do I configure OAuth credentials?
If the API your app is connected to uses OAuth 1.0a (with the Authentication Code and Resource Owner Credentials grant types), or OAuth 2.0 (with Authentication Code and Implicit grant types), you will need to:
- Configure a Shared Secret or Public Keys. See How do I regenerate a shared secret?, How do I import a certificate signing request?, or How do I import an X.509 certificate?
- Configure a Resource URL and Application Type for the OAuth versions listed above. See How do I configure an OAuth Resource URL and Application Type?
- Configure Resource Owner OAuth Authorization page which allows app developers to provide different details for branding to app users and customers. See How do I configure a Resource Owner OAuth Authorization page for my app?
How do I configure an OAuth Resource URL and Application Type?
To configure an OAuth Resource URL and Application Type:
- Navigate to App Details > Security.
- Click Show OAuth Details. The "Redirect URL" and "Application Type" currently assigned to the app are displayed.
- To update the information, click Edit. The Edit OAuth Details page displays for configuring the Redirect URL and Application Type:
- Redirect URL—Specify the URL address of the authorization server that the resource owner will be redirected to.
- Application Type—Click the radio button to indicate if your app type is Public or Confidential. See What are the OAuth 2.0 Client Types? for more information.
- Click Save.
For information on testing OAuth authorization of your app and sending a request, see How do I test authorization of my app with OAuth using the Dev Console?
After completing the configuration, continue to the How do I configure a Resource Owner Authorization page for my app? procedure to configure your OAuth authorization screen.
How do I configure a Resource Owner OAuth Authorization page for my app?
If the API your app is connected to uses an OAuth "Authentication Code" grant and you've configured a Redirect URL and Application Type using the How do I configure OAuth credentials? procedure, the next step is to configure a Resource Owner OAuth Authorization page. This screen allows app developers to provide different details for branding to app users and customers.
To configure a Resource Owner OAuth Authorization page for your app:
- Navigate to My Apps.
- Select the App Name on the summary listing. The App Details page displays.
- Select an app version from the Current Version drop-down menu.
- Click Edit Public Profile. The Edit Public Profile screen displays.
- Specify the following information to display on your app authorization screen. An example field name is specified for each screen element that maps to the illustration below.
- Title—Represents the app title that will display (for example, My App).
- Sub-Title—Represents sub-title or tag-line (for example, About This App).
- Website URL—Represents the URL that will invoke the authorization screen.
- Description—Represents the description of the app that displays below the sub-title (for example, This is the app description).
- Legal Disclaimer—Represents any copyright or legal information (for example, 2012 <Company Name> All rights reserved).
- Logo—Allows you to upload a logo for the resource. The logo should be 50px high. See How do I upload and crop icons? for more information.
- After configuring your authorization screen, click Save.
- During the OAuth authorization process, you will first see a Resource Owner Authentication page where you will perform a user login. This page may be provided by the platform, or might be from an identity provider such as Facebook® or Google®. After a successful login, the Resource Owner Authorization page displays (i.e., the Public Profile page defined above).
- Additional elements display on the authentication screen that are pulled from the OAuth Provider configuration assigned to the API the app is connected too. These include Site Logo and Grant Properties.
The screen will look similar to the following:
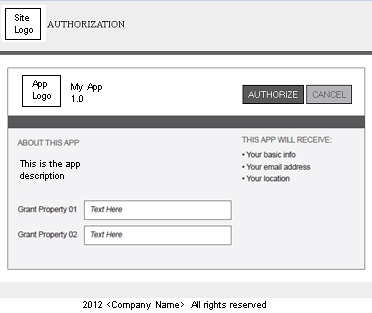
- Additional elements display on the authentication screen that are pulled from the OAuth Provider configuration assigned to the API the app is connected too. These include Site Logo and Grant Properties.
What are the OAuth 2.0 Client Types?
- Confidential Client—This client type is an application that is capable of keeping a client password confidential to the world. This client password is assigned to the client app by the authorization server. This password is used to identify the client to the authorization server, to avoid fraud. An example of a confidential client could be a web app, where no one but the administrator can get access to the server, and see the client password.
- Public Client—This client type is an application that is not capable of keeping a client password confidential. For instance, a mobile phone application or a desktop application that has the client password embedded inside it. Such an application could get cracked, and this could reveal the password. The same is true for a JavaScript application running in the user's browser. The user could use a JavaScript debugger to look into the application, and see the client password.