Developer Quick Start Guide
Get up and running with our APIs,
tools and resources before you start developing your Verizon Connect
integration. Learn how to create sample requests using our integration sample
tools.
Prerequisites
To get started, make sure that you
have the following credentials. Contact Reveal Customer Care team to have them
re-issued if required:
·
Verizon Integration Manager
(developer portal) credentials: You can create these credentials by registering for an
account at https://fim.us.fleetmatics.com/
·
Reveal REST Integration credentials – used to verify your client’s Reveal account
permissions: You should have received these from your Reveal Customer Care
representative or automatically from our Marketplace
Note: Without access
to both sets of credentials, you cannot make an API request.
Step 1: Create a Verizon Connect app
This app helps Verizon Connect
identify the developers that will be using the APIs and manages access to all
the APIs needed for your integration.
Note: If you have
created an app already, you can find it by clicking your profile icon on the
top right and selecting My Apps from
the select list. Take a note of your app’s ID and go to Step 2.
1.
Sign in
to the Verizon
Connect Integration Manager using your Integration Manager
log-in details.
2.
From your
dashboard, click Register Your App.
|
|
|
|
|
|
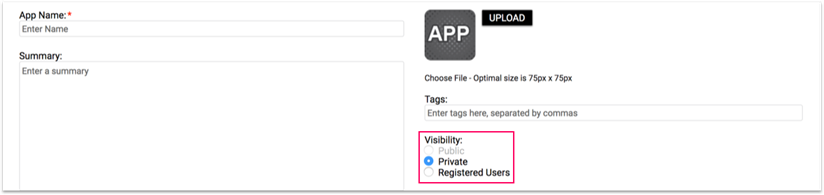
3.
Complete
the required fields on the form. We recommend setting your app’s visibility to Private so only you can see your app
details.
4.
|
|
|
|
|
|
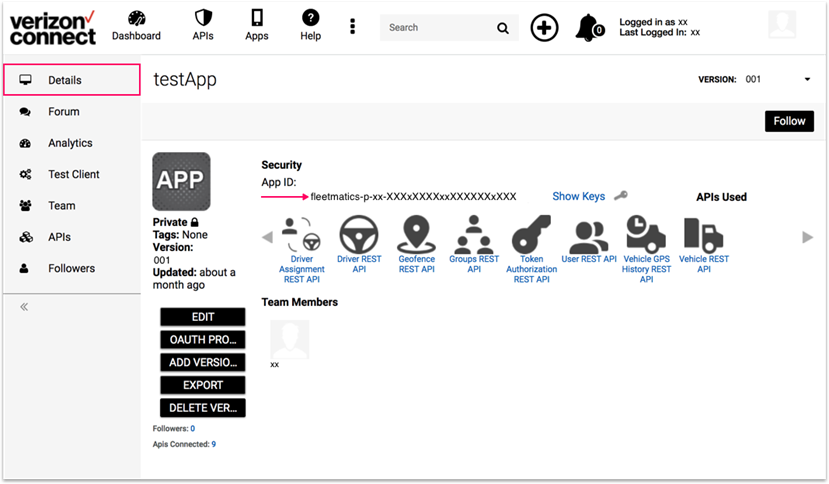
Click FINISH. You will be brought to your app’s Details screen. Your app will be assigned a unique app ID. Note down this app ID as you
will need it to authenticate your API request in Step 4.
Additional app settings
and data
· Details:
provides a list of APIs available to you. Click on an API for more information.
o Each API’s Documentation:
§ Provides information on how to work with the
APIs
§ Detail about functions, return types,
arguments and responses.
· Team:
Provides options for giving selected Integration Manager users access to your
app.
· Analytics:
Provides metrics on your app’s performance, including unique insights about
each API request within your app.
Step 2: Retrieve your authorization token
Open a Base64 encoding tool and enter
your Reveal REST integration credentials (NOT DEVELOPER PORTAL CREDENTIALS) in the format: username:password. This will return your Base64EncodedString.
Retrieve your authorisation
token, using the following Token API details. Your authorization token is valid
for 20 minutes. Note down your token value as you will need it to make an API
request.
|
API |
Token Authorization REST API - 1 (Live) |
|
Operation |
GET
(Default) |
|
Endpoint |
https://fim.api.us.fleetmatics.com/token US (Default) https://fim.api.eu.fleetmatics.com/token EU (Default) |
|
HEADER |
VALUE |
|
Authorisation |
This exact format
must be used, using your Base64EncodedString Basic [Base64EncodedString] e.g. Basic X1X1xXXxx1XxxXXxXXXxXxxXxX1XXX1Xx== |
|
Accept |
application/json |
One method of retrieving your
authorization token is to use the Integration Manager, as outlined here:
1.
From your
app’s page, click Test Client.
|
|
|
|
|
|
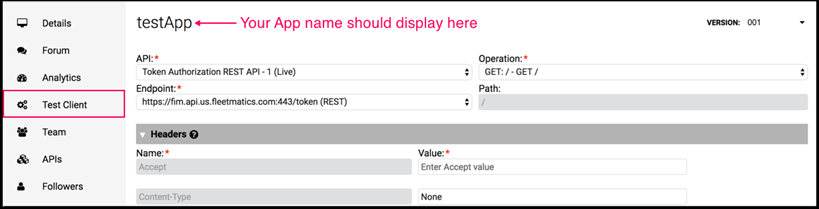
Note: If your app
name does not display as the page title, click on Apps, select your app
again, and click Test Client.
2.
Expand
the Headers area.
3.
Click Add Header.
4.
Click
into the Enter Header Name field and
select Authorization from the select list.
5.
|
|
|
|
|
|
In the Enter Value field, paste your Base64EncodedString
in the form: Basic [Base64EncodedString]
6. Uncheck all boxes under the Security button.
7. Click Invoke to view your request and response.
Step 3: Make a request
Now that you have your Verizon Connect app ID (Step 1) and authorization token (Step 2), you can
start making requests.
Note: Requests made
using the Test Client will call to the Reveal customer’s production account, so
any changes applied through the API will be reflected in the corresponding
Reveal account.
1.
From your
app’s page, click Test Client.
Note: If your App
name does not display as the page title, click on Apps, select your app
again, and click Test Client.
2.
Select
your API from the API field select list.

3.
Expand
the header area.
4.
Click Add Header and enter the following
information.
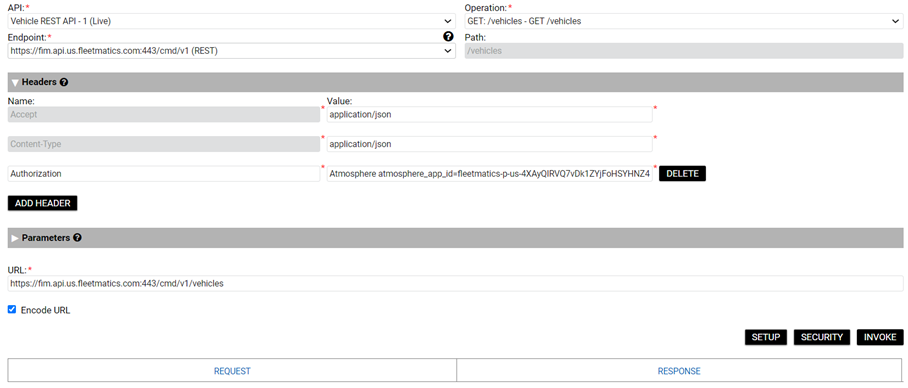
|
NAME |
VALUE |
|
Accept |
application/json |
|
Content-Type |
application/json |
|
Authorization |
This exact format must be used, using your Verizon Connect App ID from Step 1: Atmosphere atmosphere_app_id=[Verizon Connect App ID], Bearer [Authorization Token] e.g. Atmosphere atmosphere_app_id=fleetmatics-p-us-XXXXXXXX, Bearer xxxxx123456 |
5.
Uncheck
all boxes under the Security button.
6. Click Invoke to view your request and response.